Drawing with Color#
Until now, everything has been a very simple mix of gray, black and white. Let's add color to the mix! To work with colors, we should introduce a little bit of background how colors work in general.
Colors in your Computer#
Grayscale#
Let's start with brightness or intensity first. We can store a single number and say "that's how bright something should be". We then need to agree on some kind of scale, and for reasons that we'll get into later, that scale is often 0 (for "off" or "minimum" or "dark") to 255 (for "on" or "maximum" or "bright") with everything in between.

Additive Color Mixing#
When you add lights together, they get brighter. That is the basic principle behind all the screens you may currently be looking at. On screens we mix red, green and blue1. So instead of a single number, we store three!

You may know this style of color mixing from graphics software that also often offers "RGB"-Style color sliders. If you take a little bit of red and a little bit of green, these colors will add to a yellowish color. If you put all the values to their maximum, you get white!
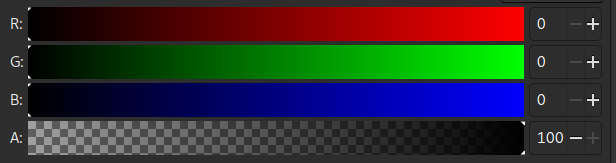
Feel free to get these color values from your graphics software, if you want! It takes a little bit of time to get a feeling for these numbers.
Other Color Modes#
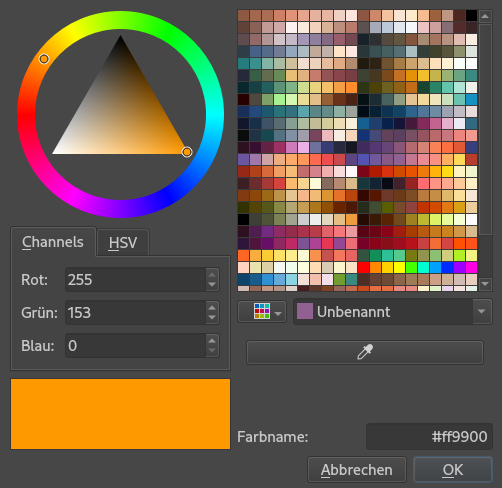
Thinking in RGB does not come naturally to most people, and therefore graphics software usually has a number of other ways to select the desired color. One really common way is HSB - short for Hue/Saturation/Brightness. You get to choose the hue from a rainbow wheel or strip and select how saturated and how bright the color is supposed to be in a triangle or square area.
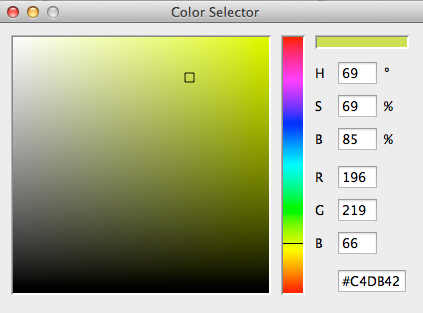
All these numbers will eventually become RGB on your screen's pixels, but HSB and other modes are so helpful, that you can also use them with Processing. To learn more about this, take a look at colorMode().
Colors and Drawing Styles in Processing#
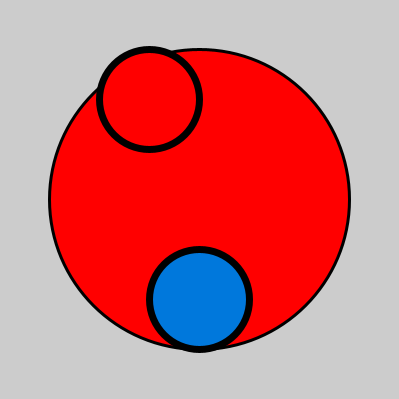
Fill#
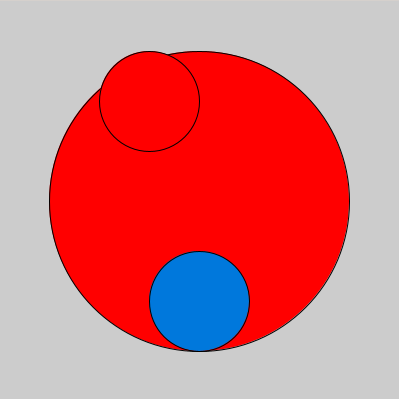
Processing has a fill()-function that takes all kinds of parameters. In the example above, we're using the form that takes RGB values.
In line 2, we're putting 255 into the red slot, 0 into the green slot and 0 into the blue slot. This sets the fill color to red for all following commands! That means, you may need to reset the color later, if you want to draw something else. This is why there are two circles that are drawn in red paint. Only the third one is blue, because we changed the fill color again in line 6.
If you do not want any fill, there's the noFill()-command.
Stroke Weight - or no stroke at all!#
By adding strokeWeight() in lines 2 and 5, we're changing how thick that outline should be. It takes one parameter, and that is the thickness in pixels. Like before, setting the stroke weight to some value has an effect on all later commands. After setting the weight to 7, both smaller circles get drawn with the bold outline.
If you want to get rid of the stroke altogether, you can do that with noStroke().
Stroke Color#
You may have noticed that the circles above have a black outline. This can become any color you like via the stroke()-command! It works pretty much exactly like the fill() command we've seen earlier.
StrokeCap and StrokeJoin#
There are more options to stroke, yet: I'll let you read about them in the reference documentation:
strokeJoin()changes how the stroke behaves in corners.strokeCap()changes the beginnings and ends of lines.
Alpha#
So far, we only fed three parameters to fill() and stroke(), but you can give them a fourth parameter. That last parameter is called "Alpha"
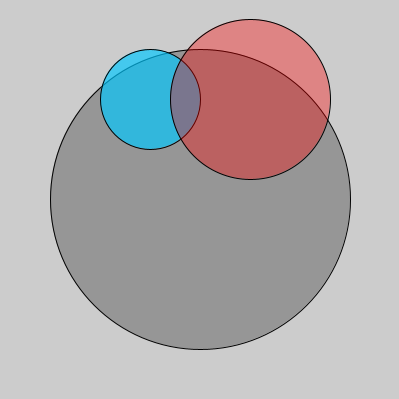
size(400, 400);
fill(150, 150, 150);
circle(200, 200, 300);

fill(0, 200, 255, 170);
circle(150, 100, 100);

fill(255, 0, 0, 90);
circle(250, 100, 160);
The highlighted lines both have a fourth parameter in their fill() commands. These belong to the slightly transparent blue and red circles. Alpha is also a number between 0 and 255, and a high number means "very visible" while a low number means "mostly transparent".
Relevant excerpt from Learning Processing#
(the section starts at 44:40 and runs through 1:04:39, the video should start and stop on these automatically.)
-
If you are interested in a whole rabbit-hole beyond "red, green, blue" I can recommend this introduction to Color Spaces by Bartosz Ciechanowski. ↩