Drawing Freeform#
Curve#
Curve takes four points. Imagine a smooth line between all four points, but only the section between Points 2 and 3 actually gets drawn.
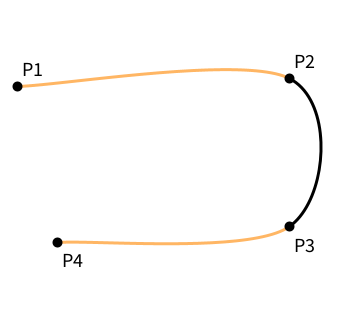
That black part is drawn just by the highlighted curve() on line 10. The two other times curve is used on lines 7 and 13 show you how the parts of the curve would look that are usually not drawn at all. Everything else is just extra decoration to draw in the four points.
Bézier Curves#
Bézier Curves are everywhere in 3d modeling and animation. They are extremely powerful and also pretty easy to compute. They also give you a good deal of control over how they look. If you have ever worked with vectors in a program like Inkscape or Illustrator, you will very likely have seen these kinds of controls for curves where you get two extra "handles" and the curve tries to find a smooth path between the handles and the endpoints.
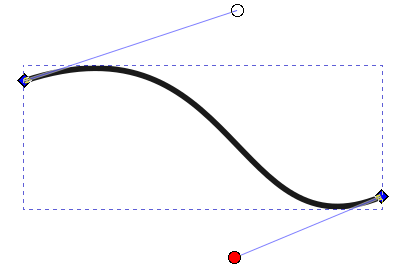
These are Cubic Bézier Curves. I highly recommend going into more detail by watching Freya Holmérs video1 mentioned in the footnotes. Processing has a command bezier()-command that lets you draw these curves:
This piece of code would look like this The black curve is drawn by the single call in line 11, everything else is just decoration. You can see that this command takes four points. The first and the last are the position of the anchor points. The two points in the middle are what you would call "control points" in your graphics software.
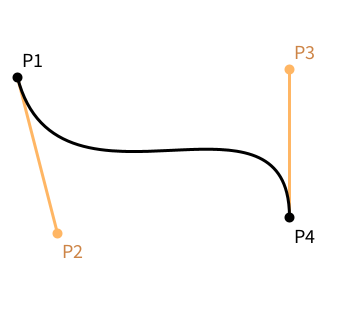
The same four points!
It is also worth mentioning that the previous two examples use the exact same four points, but they have very different meaning in bezier() or curve().
Shapes and Vertices#

We have seen a ton of basic shapes, but what if you need a single shape that is not a circle or a quad?
size(300, 300);

beginShape();// start a new shape
vertex(100, 50); // add a vertex to the shape
vertex(114, 80);
vertex(147, 85);
vertex(123, 107);
vertex(129, 140);
vertex(100, 125);
vertex(71, 140);
vertex(77, 107);
vertex(53, 85);
vertex(86, 80);
endShape(CLOSE);
Here, we are instructing processing to start a single new shape, we then add a bunch of vertices to it, and it connects the dots and fills in the area. The relevant commands here are beginShape(), vertex() (which takes x- and y-coordinates as parameters) and endShape() (which can also be instructed to automatically CLOSE the shape). Neat! There are a couple of other possibilities with shapes, too:
size(300, 300);

beginShape();// start a new shape
vertex(100, 50); // add a vertex to the shape
vertex(114, 80);
bezierVertex(114, 50,  147, 50,  147, 85);
vertex(123, 107);
vertex(129, 140);
vertex(100, 125);
vertex(71, 140);
vertex(77, 107);
vertex(53, 85);
vertex(86, 80);
endShape(CLOSE);
bezierVertex() starts at the vertex from the previous command and adds two control points and one endpoint to it.
More and more commands available#
I encourage you to skim over the Processing Reference Docs, because there are even more things available than I am describing here. What you have seen so far will give you a pretty broad set of possibilites.
-
For some more detail about how Bezier Curves work, watch Freya Holmérs video The Beauty of Bézier Curves. Seriously, this is mesmerizing. You can then continue to watch all of her other videos, too. She also has an amazing Video about Splines and their continuity. ↩